made by little hands

We had a lot of fun last weekend making these pretty little tissue paper candle holders that we spotted over at The Artful Parent. It was a good project for chubby little hands and a fairly short attention span. And a very limited gift budget! Unlike a lot of toddler-made gifts, these are actually useful and beautiful. And not just beautiful in that awww, Wren made this so it’s beautiful kind of way. But really, truly lovely as the light flows through them during the day and filled with candlelight at night too.

Bonus: you’ve probably got (almost) everything you need to make these. I bought candle holders at the dollar store, but baby food jars or jelly jars would be great too. Tissue paper? Check. Mod Podge? Check. Supposedly watered-down Elmer’s glue would work too, but I love Mod Podge. It dries clear and is water-proof. Glitter? Check. Foam brushes? Check. Go!

Are you enjoying a hand-made Christmas? I had grand plans for a hand-made Christmas, but we’ve just dipped our toes in that proverbial water this season with a few small projects and lots of edibles. But with a long winter stretching out ahead of us, we’ve got ambitions for lots of creative pursuits. I would like to make some art of my own too. Someone asked Wren recently if she watches me paint and she said, “no, Mama doesn’t paint.” Boo hoo! It reminded me that I haven’t painted in way too long and it saddened me that she didn’t see me in my own creative work. Just washing the dishes, which she is proud to declare. Sigh. So there’s a good resolution for the coming year: make time for my own creative work. And a helluva lot more fun than the standard “lose thirty pounds! Work out every day! Stop eating sugar!”

What about you, parents. How do you find time for your own creative work? Is it important to you that your children see you creating as well?

Wren’s Play Kitchen!

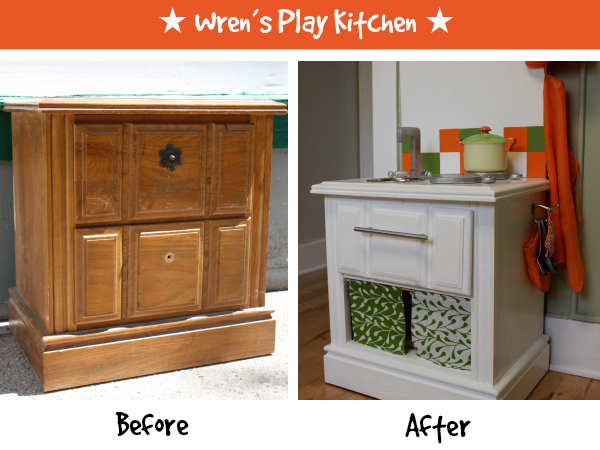
I’m very excited to share this project with you, lovelies! I spotted the (ugly-as-sin) nightstand in a nearby alley well over a year ago with heartfelt intentions to make it over into a play kitchen for the little birdie that very day. I saw other DIY play kitchens like this by Vintage Songbird and this one by Vicki Howell made from old nightstands and was inspired to make one for Wren.

Chris snagged it for me, dragged it home and then it lived in our basement, awaiting a transformation. It waited and waited. What a patient nightstand! It was going to be a 1st birthday gift, then it was going to be a Christmas gift, and now (finally!) a 2nd birthday gift. Yahoo!

Here are some images and a few notes on the process…

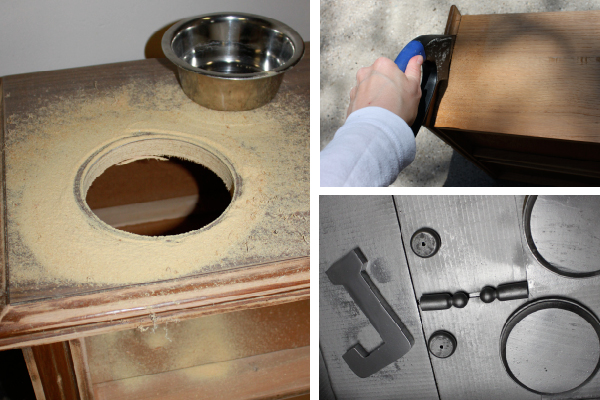
First I hauled the nightstand outside and sanded everything down so the paint would adhere better then the real work began on making the piece of junk great alley find look like a kitchen.

Everything AND the kitchen sink. I found an old metal dog bowl at Goodwill for $.99: perfect for a little sink and perfect for the wallet too. Chris cut out the hole for me after I tried and failed to do it myself.  Meanwhile I sawed off the front of one of the drawers and discarded the other pieces. Then I spray-painted the wood pieces for the burners, knobs and faucet. The faucet is just an upside-down “J” that I saw on other play kitchens.
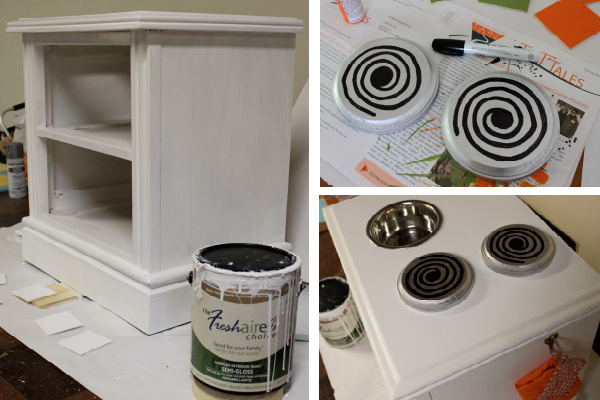
Then I painted the whole nightstand with about three coats of white paint. I hand-painted the burner coils with a Sharpie paint pen. Then glued them on to the cooktop area with some handy Gorilla Glue. That stuff rocks! I also screwed on a little coat hook on the side for a hot pad and oven mitt (on clearance at Michael’s for $.99, yesssss).
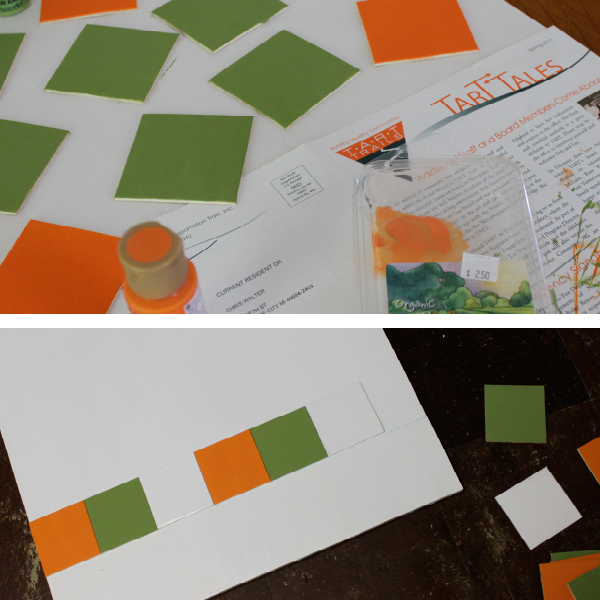
Next up, the backsplash. I painted the backsplash tiles orange, white and green. These are just simple $.29 wood craft tiles that were easy to adhere with the glue to the plywood board we attached to the back of the kitchen. I still want to add a shelf to the back of it because it looks a bit naked, but I haven’t done that yet.
I don’t have photos of the entire process because it was LATE the night before Wren’s birthday and it caused a near-divorce situation as I begged Chris to help me with “just a few quick things,” which of course turned into more than a few things. He was already really tired from installing our new fence, working all day and then I threw him his list, which included installing the hinges, installing the little cabinet magnet so the “oven door” would more easily stay closed, screwing on the handle, screwing on the knobs so they turned (washers!) and screwing on the faucet. Meanwhile I sewed the little curtains and fed them on a dowel, touched up paint and tried to stay out of harm’s way… Let’s just say it wasn’t a very pretty scene.

BUT. I think it was all worth it when the little birdie came down in the morning to greet her new kitchen. The funny thing is that she just got right to work, like she knew exactly what to do. Grabbed the tea pot, filled it up with water and served it up. Put the oven mitt on and checked on the pizza in the oven!
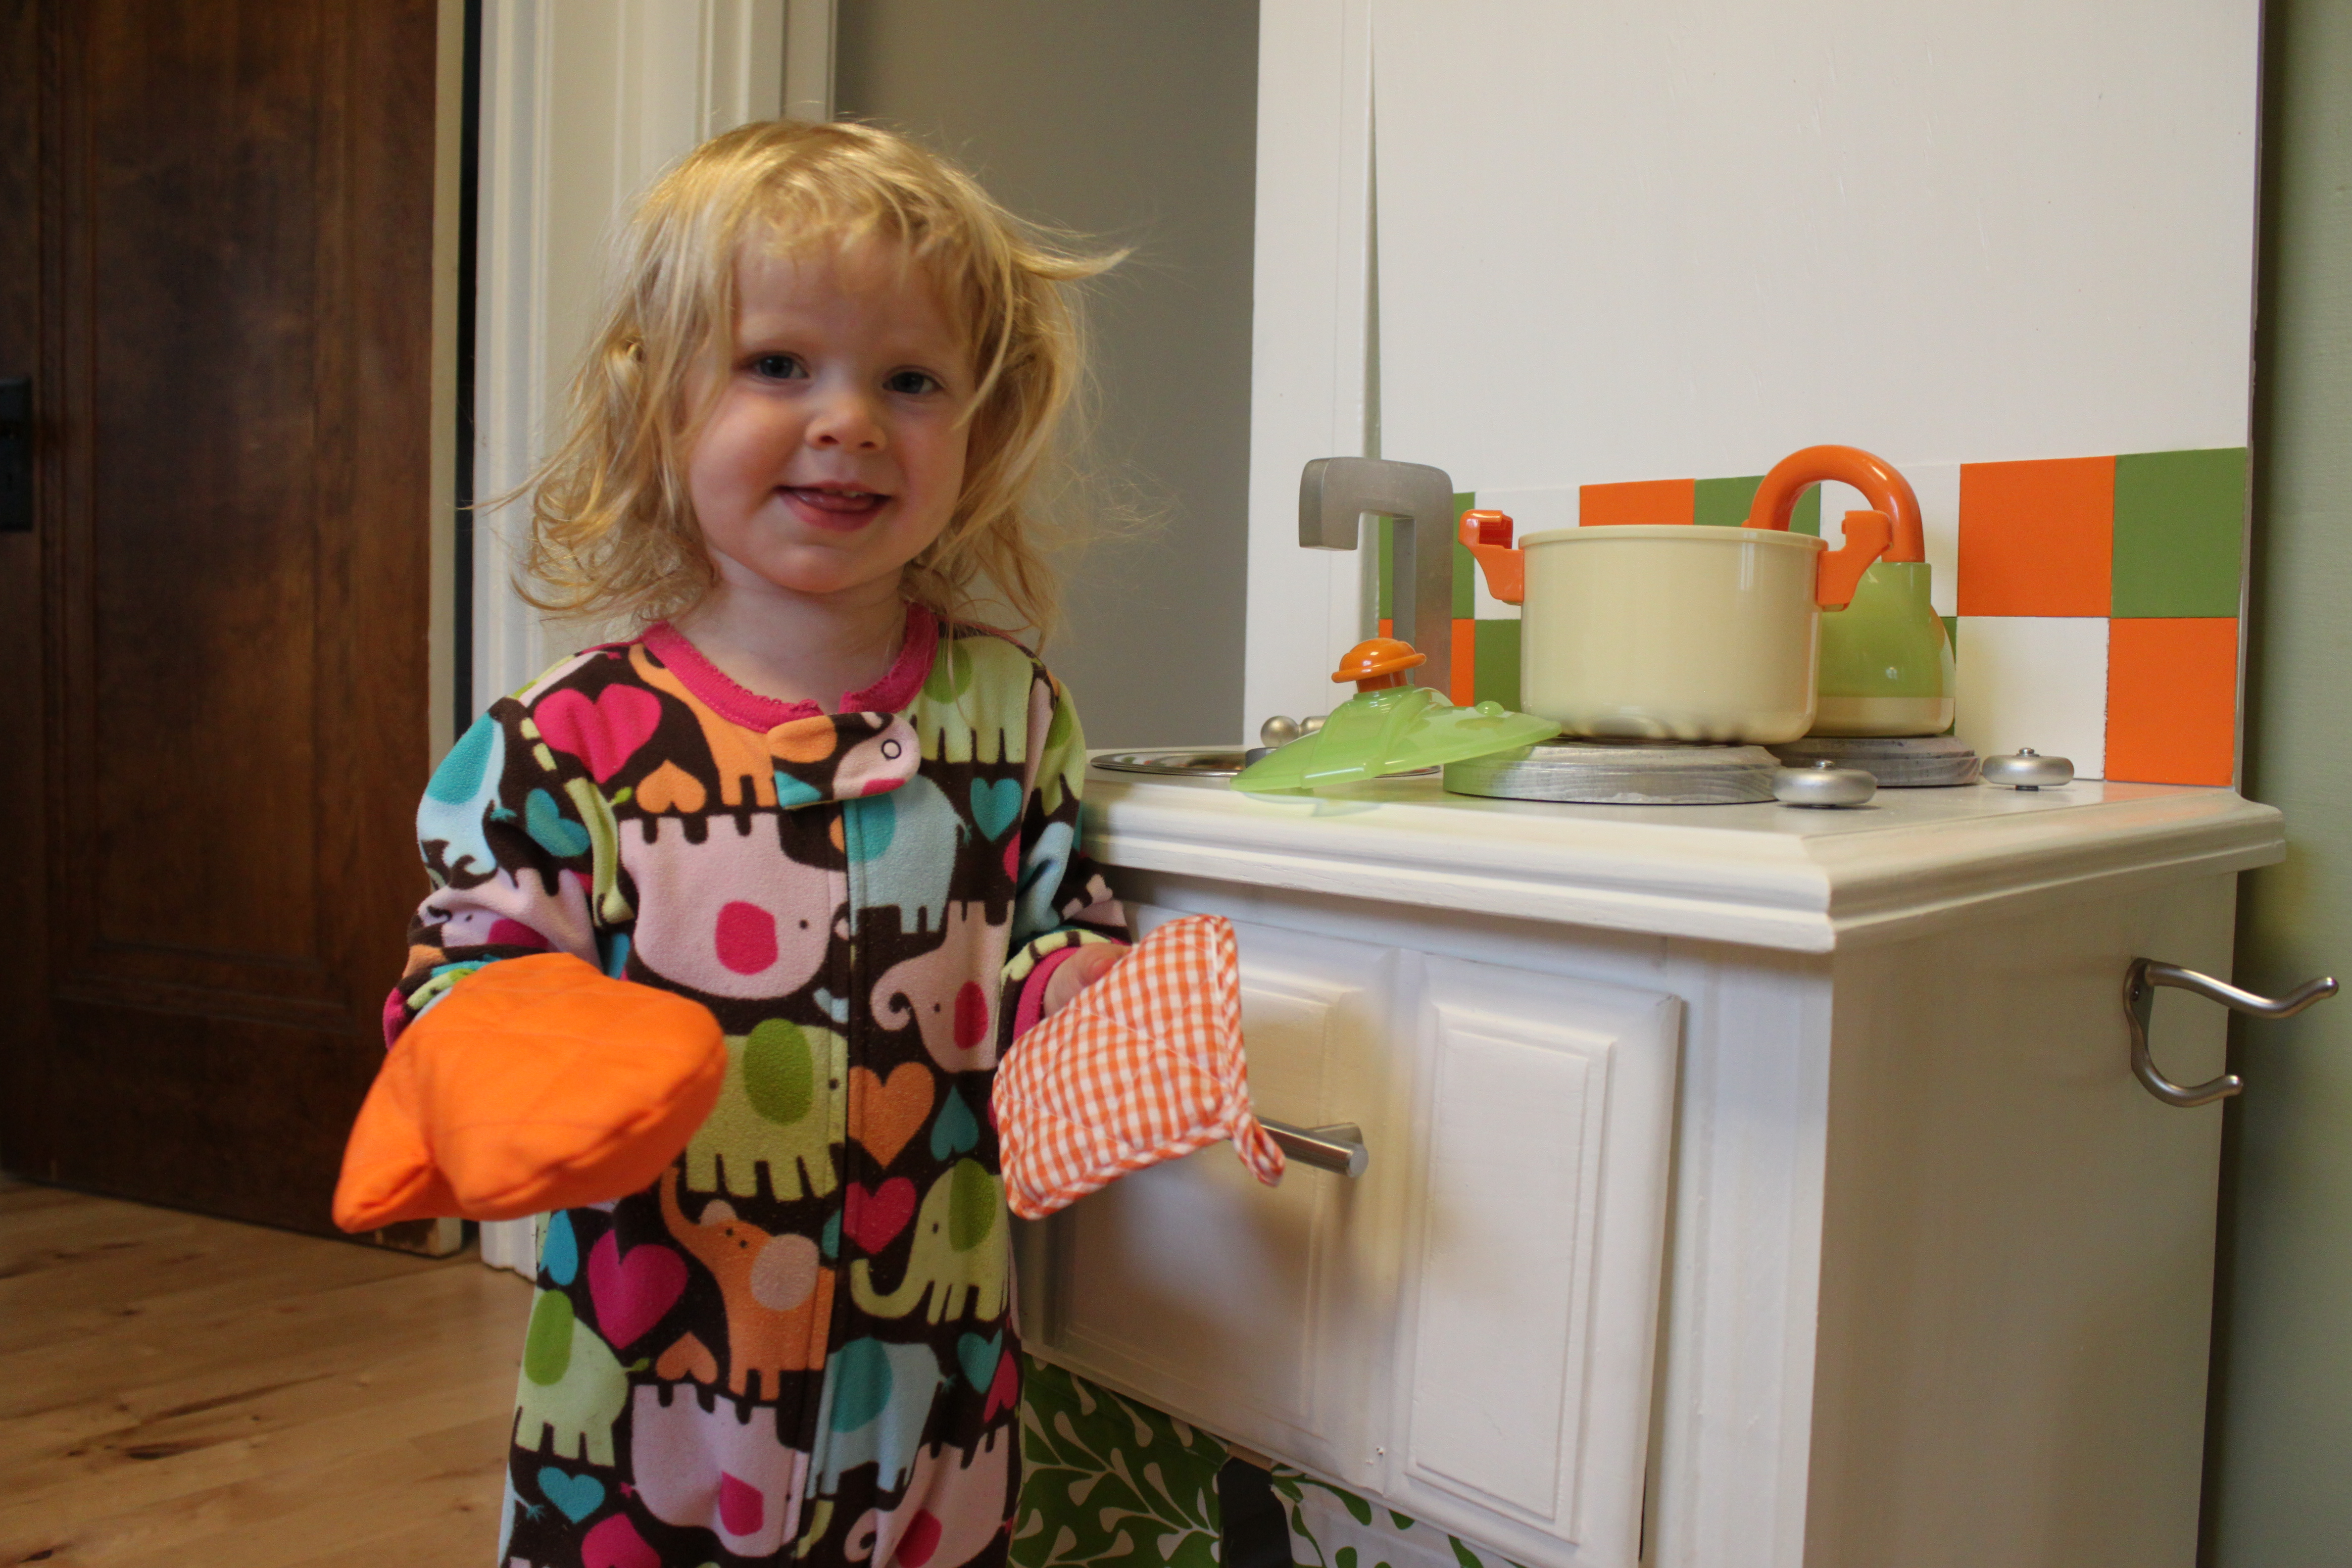
Day two and the party continues! Apparently, popcorn is a popular thing to cook…

Thankfully the little birdie loves her new kitchen and we’re proud of it too. The irony is that Wren’s kitchen is the best part of the entire kitchen. Case in point, Wren has an oven. Our oven hasn’t even made it into the kitchen yet! We’re still using our old one in the basement. Yeah, that’s convenient. Ahem. This project has inspired me to tackle the REAL kitchen, but where to begin?!

What kind of projects are you tackling these days, lovelies? What has inspired you to get moving on them? Do you need a deadline too? Ahh, to be only human.

Invites? Check.

The little birdie turns two next week, woah! It’s a good thing I’ve regained my energy after the first-trimester slump because my nesting instincts are kicking into high gear. Nesting AND celebrating really. We’re planning a party for Wren over Memorial Day weekend when we’ll have family in town for the long weekend and it’ll be here before I know it.

This week, I finished up the birthday invites and will be sending them out today. If I write that, then a trip to the USPS has to happen. I want to share them with you because I think they came out great. Let me know what you think!

So here’s how I did it:

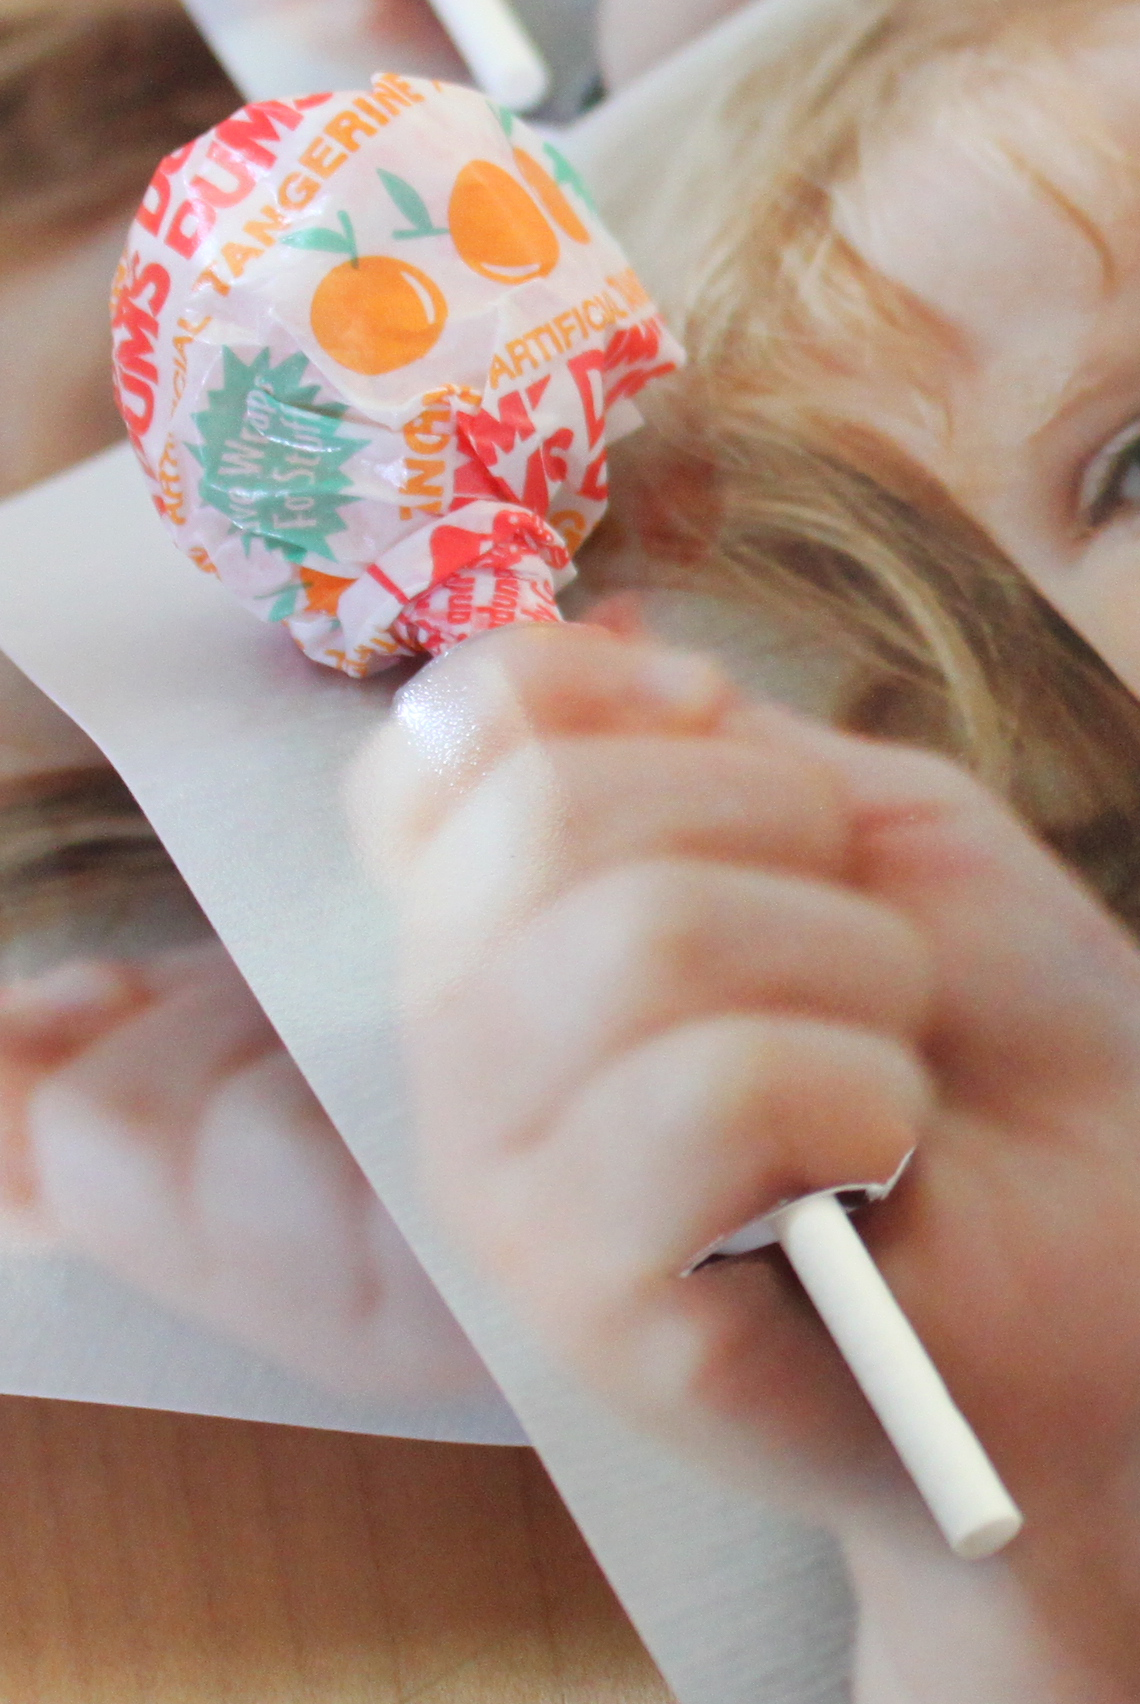
1) Take a photo of your child making a fist. This was easier said than done as the little birdie wanted to make TWO fists. Two would’ve been OK, but then that would necessitate two suckers in each. Plus her fists kept ending up right in front of her face. But finally, we got a pretty good shot of one fist, to the side. Here’s an outtake:

2) Then I brought the chosen photo into InDesign (any layout program would work) and created a 5 X 7 document with the party invitation at the bottom of the card.

3) I then made a .jpg of the invite and uploaded the image to an online photo service (Snapfish, Shutterfly, Kodak, they’re all fine) for printing.

4) A few days later, they arrived. Yippee! I just love getting mail, don’t you?

5) Grab yourself a bag of suckers (next time I might get some flat ones to make mailing them a bit easier…) and an X-Acto knife. Let the fun begin!

6) Cut about a 1/4″ – 1/2″ slit at the top of the fist and one at the bottom of the fist and slip the sucker through the holes. Voila! You’ve got your sucker card.

Lovelies, I didn’t just wake up one morning with this brilliant idea. Far from it. Thanks be to the Internet and the Blogosphere of endless ideas. I was inspired by an idea for a Valentine’s Day card I had seen over at Design Mom. And she borrowed the idea from Alissa. Let me know if you make one and send me a link.

Party on!

P.S. You might notice our gift note at the bottom. We originally wanted to have a “no gifts” party because we don’t want a bunch more stuff, but know that people often feel they want to contribute something to honor the birthday. So after agonizing over it for a while, we decided to ask people to consider making a small contribution to a swingset that we plan to build soon. This way, it’s something everyone can use and enjoy! What are your thoughts on “no gifts” parties, lovelies?

UPDATE: I decided to change the sucker for mailing purposes because it was going to require, get this, FOUR stamps. 

Bagels? Oh yes, you can.

I never thought I could make bagels myself. I’m not sure exactly why, but I just thought it was something that I could only buy from someone else. And since I don’t think very highly of the huge, soft & fluffy things that some bakeries like to call “bagels,” I was thrilled when I stumbled upon this post about making bagels. Really?! I could make (good!) bagels at home? The recipe didn’t even look too daunting. Could this be?! I had to find out. So Friday afternoon I jumped into the process of making the simple dough and by Saturday mid-morning, we bit into our first batch of crunchy, chewy homemade bagels! Yes, it can be done! You too can make bagels, lovelies. Click here for the recipe. Note on the recipe: I made a double-batch, which made twelve bagels instead of 6; I wasn’t going to just tip-toe into this, folks.

I can’t tell you how empowering it is to accomplish something like this. It makes my head swirl with other things that didn’t seem possible, but of course, they ARE. Do you have something that you love to eat, but think you can’t make them at home for some reason? I’d love to hear about it. Write me and let’s figure out how to make it, shall we? Please and thank you.


P.S. I wrote the other day about how I just can’t find a good bagel north of Detroit. Oops! Chris reminded me that I forgot about L’Chayim in Beulah; excellent bagels, just not open all year…

Click on, please and thank you

Almost 50 and sunny here today! The robins are twerping, the crocus are blooming, the puddles are growing. Bye bye, winter, bye bye. Wait a minute! Didn’t we already go through this?! Ahem. We’ve got some fun things planned for tonight and Saturday, but Sunday? Nothing planned, just how we like it. Any fun weekend plans, lovelies? Thanks for clicking in on me today. Here are a few things I thought you might like. Enjoy!

Happy April, friends. Was that the longest March EVER? Whew.

spring break… in a box!

One thing that always helps me to get out of a woe-is-me funk is to cheer someone else up. So a few days ago I decided to make a “Spring Break… in a box!” for a good friend who also lives in the frozen, crusty, will spring ever come?, upper midwest. She just started a new job and you know what that means, lovelies: no vacation any time soon. So I shipped off this fun box to her this week and I can’t wait to hear her response. Hopefully she has a spectacular trip and sends me a postcard! Shhh, it’s a surprise!

Contents? The basics for a DIY living room Spring Break! Crank up the heat, pop in some cheesy music, throw the drink on ice… Relax!

  • a flowery lei
  • orange flip-flops
  • a couple shells
  • a fun cup
  • some tequila and orange juice
  • a few drink umbrellas
  • beach ball
  • and a coconut!

Full disclosure: I was inspired to make this gift from You Are My Fave’s Birthday in a Box idea. So cute, right?

P.S. Lovelies, don’t tell the USPS that I sent alcohol in the mail…

Happy December!

I’m so grateful that December is here and we’ve got enough snow to make it feel festive! Nothing like a little dusting of snow to make me get a little squirrely with my holiday creations. How ’bout you? This year, I’m planning on making pomegranate jelly, spiced nuts, peppermint bark and maybe some orangettes. Maybe. They’re a lot of work, but they’re so beautiful and delicious. I’ve also got a bunch of green tomato jam and green tomato chutney to wrap with pretty papers and twine.

Dear readers, you might also love this list of 40 Yummy Presents that you can make and share with friends, family, your hairdresser, therapist, dog sitter, child’s teacher… I don’t know about you, but I don’t have the cash or the consumer inclination to give much STUFF this year. How will you be celebrating the spirit of giving without giving too much stuff?

Happy December to you and thanks for clicking in on me today. I’m glad you’re here.


Invites. Check!

So I’m a bit behind in Wren’s birthday party planning. I JUST got the invites out and the party’s on the 30th… Did I mention that I was a bit behind? But I’m really happy with the design. Just wish I had gotten it done last week. Alas…

  • Invites. Check!
  • Birthday banner. Check! Although I had a ridiculous (?) thought yesterday that I would make a new one in fuchsia and tangerine to match the other party elements…
  • Cups and napkins. Check!
  • Cupcake ingredients. Check!
  • Candle in the shape of a number one. Check!
  • Menu of sugary goodness. Check!
  • Thumbelina zinnia plants growing well for the favors. Check!
  • Party dress. Check!
  • Beautiful weather…. ?
  • Thinking of making some of these wheatgrass centerpieces for the dessert table. Have you ever done this? I like these. How springy!

Now I’m pondering a fun activity for the older kids – other than eating sugar. Any ideas, dear readers?

Grapefruit pits?

I am no hippy. But (you could see that coming, right?) I have been trying to go a deeper shade of green in our nest and this weekend, I admit to experiencing what I will coin a “happy hippy moment.” Our nest used up all the homemade laundry soap that I posted about last month so I decided to make a double batch this time.

While Chris mowed the lawn with Wren on his back…

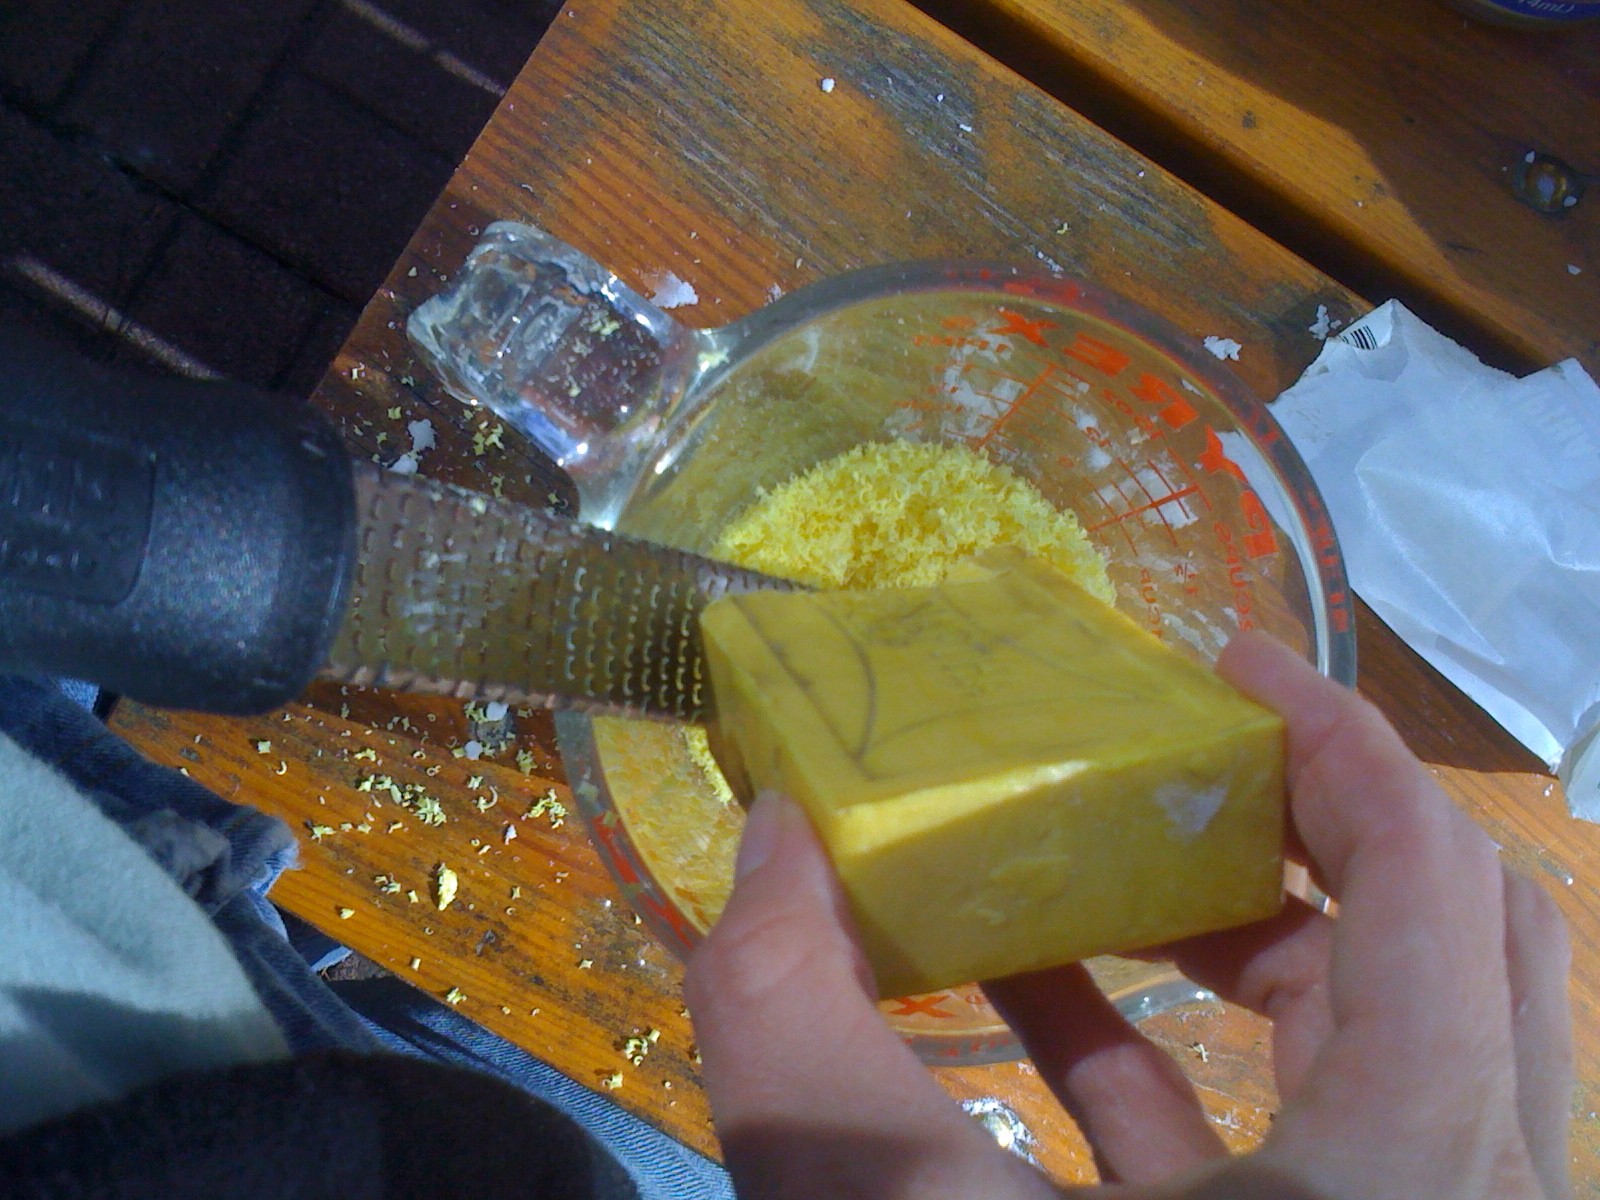
I decided to make a batch of homemade deodorant (not anti-perspirant) that I read about a while back on How About Orange’s blog. It appealed to me because I’ve tried just about every “natural” deodorant out there with mixed results and I cringe when I think of all the sticks I’ve thrown away (err, recycled, but still) over the years. For the last few months I had been using Tom’s and of course, like most of the crunchy ones, it smells pretty good (lavender), but the smell doesn’t last and by the end of the day, I’m smelling a bit too ripe. God forbid if I run or practice yoga then smell my pits. Alright, enough personal blah blah blah about my arm pits. Moving on.

Furthermore, the crunchy stuff is pretty darn expensive so this DIY deodorant was sounding more and more desirable. But was it going to actually work? I often have that gut-reaction to a DIY crunchy solution to life’s battles. Probably because the marketing wizards and all the fancy pants packaging has convinced me that there’s no way a “home remedy” was going to work…

But I’m here to tell you that after a weekend of wearing it, I’m thrilled with the results. Really! I wish again for a scratch-and-sniff blog feature so you could’ve smelled my pits after a kick-a** ashtanga yoga practice this morning, but alas, no such luck. You’ll just have to take my word for it.

I guess you’ll just have to have a “happy hippy moment” of your own and make some. You will not be sorry.

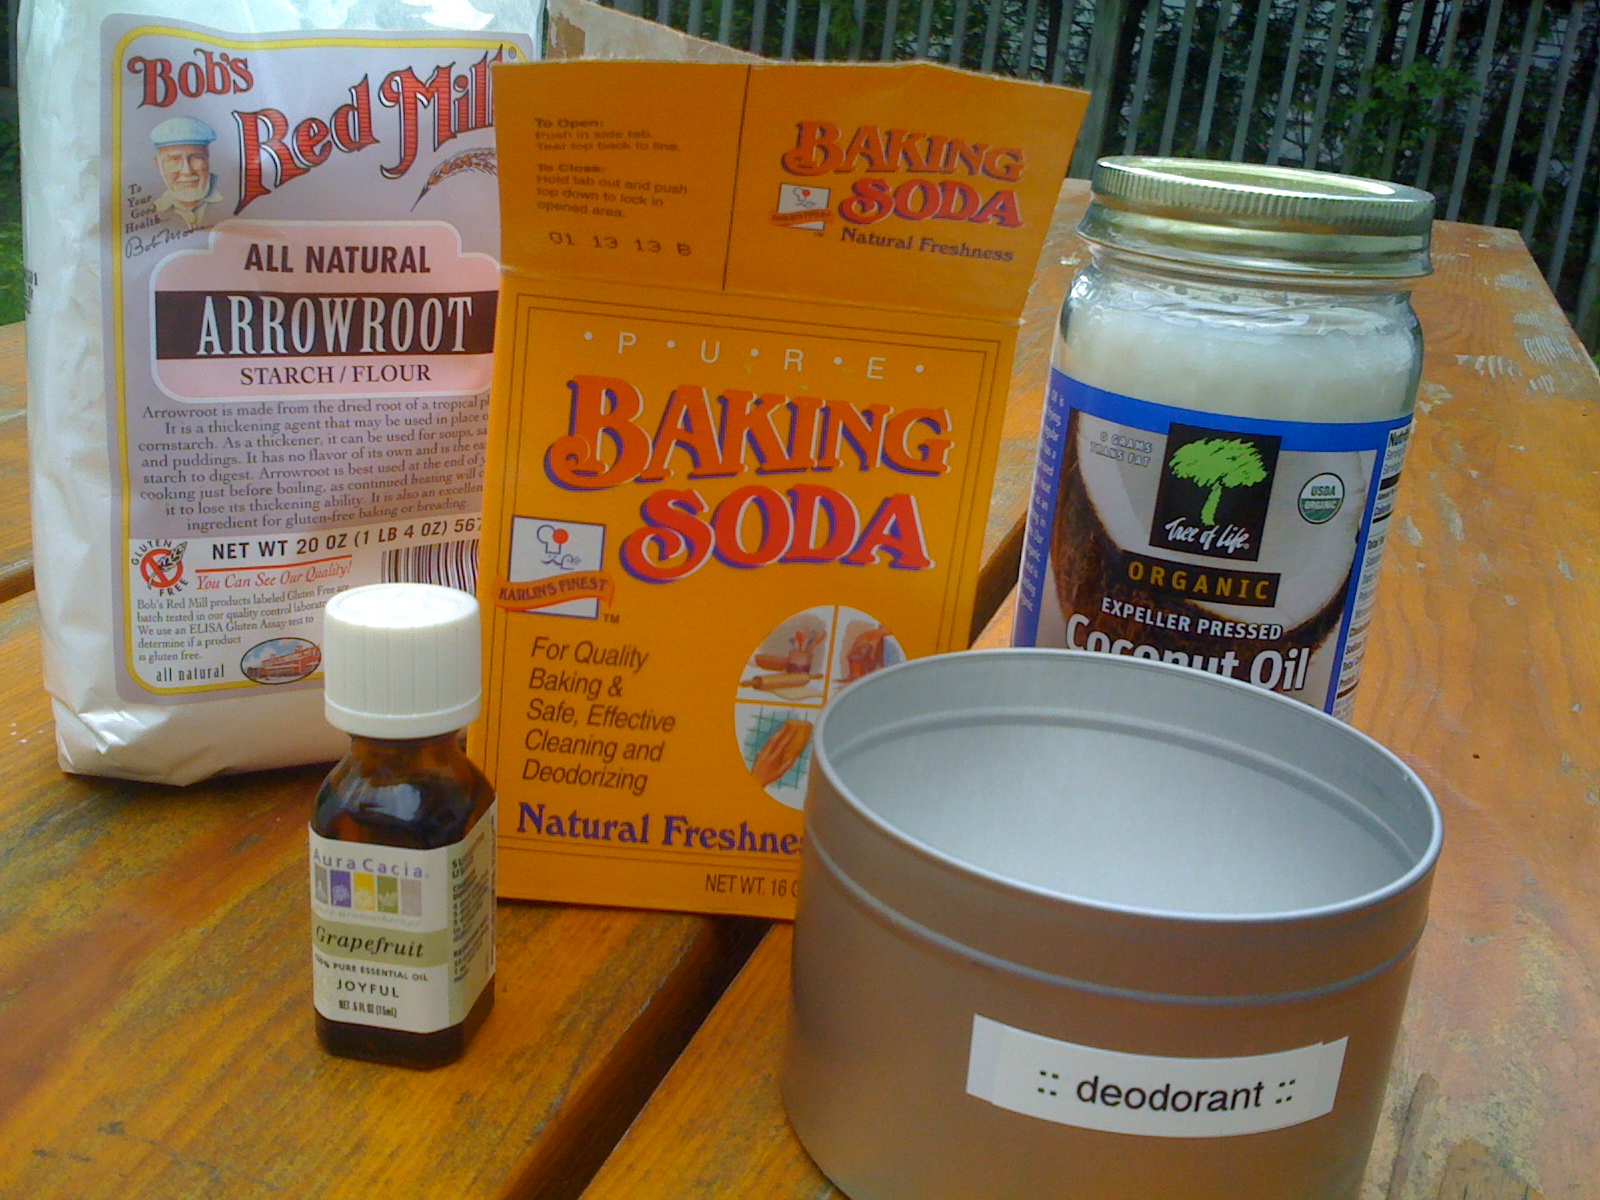
Grapefruit Pits Deodorant

Ingredients:
1/4 cup baking soda
1/4 cup arrowroot powder
4 tablespoons coconut oil
10 drops/shakes grapefruit essential oil
A tin or jar with lid

This amount will probably last about 4-5 months. Wow!

How to:

In a bowl, stir together your dry ingredients, then add the oils gradually until you like the consistency, mixing together with a fork. Note: Mine got a bit too thick to stir together at one point so I zapped it in the microwave to increase the viscosity and made it oh-so-easy to stir. Scoop into your container of choice and store the closed container at room temperature.

To apply, scoop up a bit with your finger, hold it against your skin for a couple seconds so it melts a little, then rub around.

Absolutely lovely! Thanks, How About Orange, for the great tutorial. I’ll be forever thankful.

How was your weekend, dear readers? Any progress on your gardens? Did you kick back and read a good book? Eat anything good? I’d love to hear about it.

Best!